

Introduction to Cloudflare Nameservers
Cloudflare’s nameservers play a pivotal role in enhancing website performance and security. By acting as intermediaries between users and web servers, they provide increased efficiency through faster DNS resolution. When users request a website, Cloudflare’s global network routes this request to the nearest data center, significantly reducing load times and latency. This capability not only improves user experience but also boosts SEO rankings, as site speed is a critical factor considered by search engines.
Moreover, Cloudflare’s nameservers offer robust security features. They protect against threats such as DDoS attacks, which can overwhelm a website by flooding it with traffic. By filtering out malicious requests before they hit the origin server, Cloudflare ensures that legitimate users can access the site without disruptions. Additionally, Cloudflare provides SSL certificates, ensuring that data transferred between the user and the website is encrypted, thereby improving trust and compliance with privacy standards.
Utilizing Cloudflare’s nameservers not only streamlines website performance but also fortifies it against emerging security threats, making it an essential tool for modern web management. For a deeper understanding of how to change your DNS, explore our article on how to change nameservers of your domain.
Preparing for the Update
Before changing your nameservers, it’s essential to follow a series of preparatory steps to ensure a smooth transition. Here’s a detailed guide:
- Backup Existing DNS Settings: Start by documenting your current DNS records, including A, CNAME, MX, and TXT records, among others. This backup is crucial in case you need to revert to the original settings. Utilize your domain registrar’s interface or external DNS management tools to export or manually copy these details. For reference on managing DNS records, visit our guide on How to Change Nameservers of Your Domain.
- Understand Your Current DNS Records: Familiarize yourself with the significance of each type of DNS record you have configured. For instance, A records point your domain to an IP address, while MX records define how emails are routed. Misunderstanding these can lead to downtime or loss of email functionality.
- Check for TTL Settings: Time-To-Live (TTL) settings dictate how long DNS information is cached by resolvers. Lowering the TTL a few days before the change can help spread the updated DNS records more quickly after the changeover.
- Ensure all Services are Supported by New Nameservers: Verify that your new nameservers can handle all the services associated with your domain, such as web hosting and email. This includes compatibility with any existing configurations you’ve set up through your previous nameserver.
- Consider a Changeover Window: Schedule the change during off-peak hours to minimize potential disruptions, especially if your website receives significant traffic. This practice also allows time for any propagation issues to resolve without immediate impact.
- Communicate with your Team: Inform anyone who works with your domain such as IT staff or stakeholders about the change schedule to prepare for any issues that may arise during the transition.
Following these steps can help mitigate risks associated with changing nameservers, ensuring a seamless transfer without disrupting your online presence. For more insights on domain management, explore our other articles at Hordanso Blog.
Step-by-Step Process to Update Your Nameservers
Updating your nameservers to Cloudflare is a straightforward process that enhances your website’s performance and security. Follow these steps to complete the update:
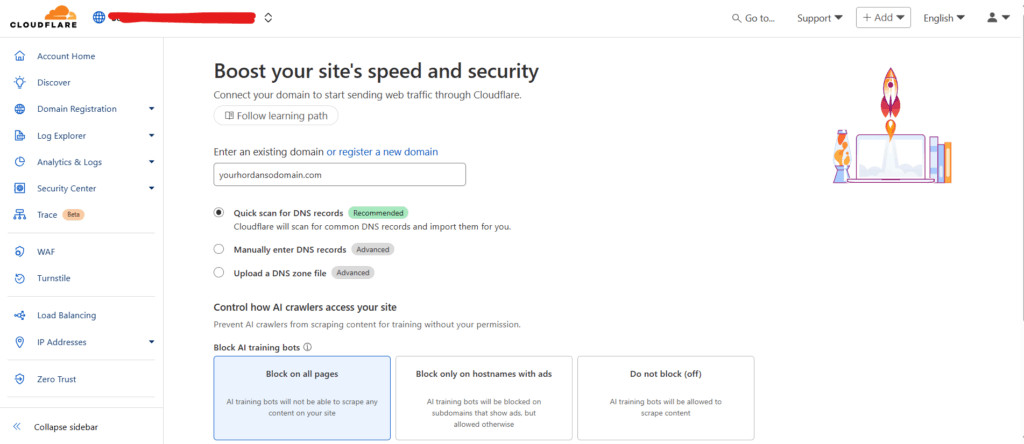
- Sign Up and Create an Account on Cloudflare: Visit Cloudflare’s website and create a free account. Once registered, add your website by entering its domain name when prompted.
- Choose a Plan: After adding your site, you’ll be guided to select a plan. For most users, the free tier is sufficient, especially for basic website functionality.
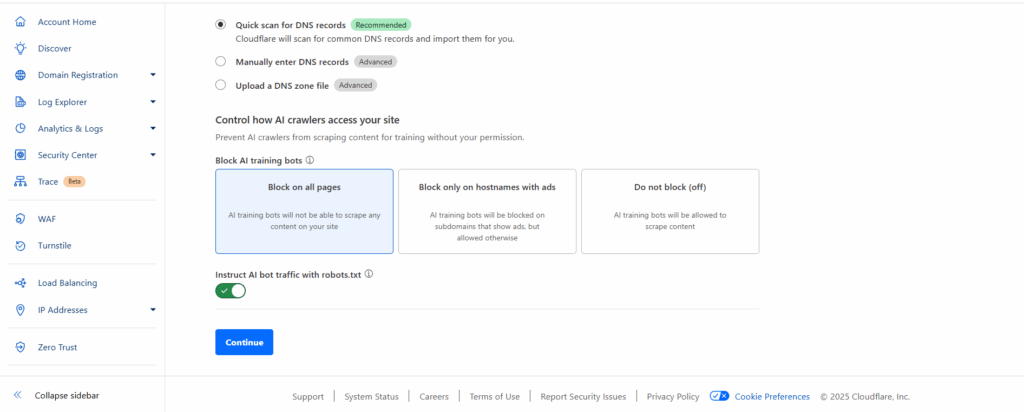
- Cloudflare Scans Your DNS Records: Once you enter your domain, Cloudflare automatically scans existing DNS records. Review the records make sure all necessary ones are present. You can add any missing records as needed.
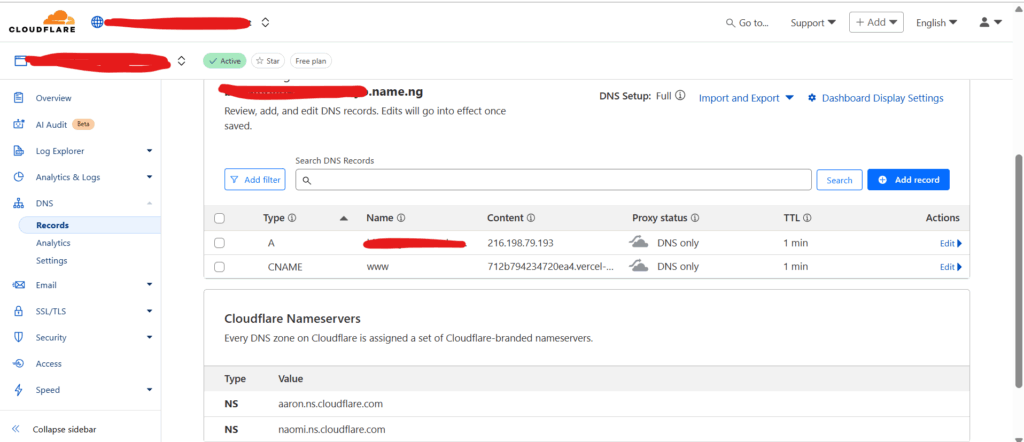
- Change Your Nameservers: Cloudflare will provide you with two new nameservers (e.g. `bob.ns.cloudflare.com` and `lisa.ns.cloudflare.com`). Take note of these nameservers.
- Access Your Domain Registrar: Log into the account where your domain is registered (e.g. Hordanso, GoDaddy, Namecheap, etc.). Navigate to the domain management settings.
- Update Your Nameservers: Locate the section for updating nameservers. Replace the existing nameservers with the ones provided by Cloudflare. Ensure you save your changes.
- Confirmation from Cloudflare: After changing the nameservers, return to your Cloudflare dashboard. Click the “Continue” button. Cloudflare will check if the nameserver update has propagated. This may take up to 24 hours.
- Verify DNS Resolution and Security Settings: Once propagation is complete, confirm your website is functioning correctly. Review Cloudflare settings like SSL, firewall rules, and caching options to optimize performance.
Common Issues and Troubleshooting Tips
During the update process, users may encounter several common issues that can disrupt their workflow. Here are some potential problems along with effective troubleshooting strategies:
- Compatibility Issues: New updates may not be compatible with existing hardware or software configurations. To troubleshoot, ensure that all system requirements are met by checking the vendor’s website for compatibility information.
- Slow Performance: After an update, systems may operate slower than usual. This can stress users who rely on efficiency. A common fix is to clear caches or uninstall unnecessary applications that may be hogging resources. Additionally, running a performance diagnostics tool can help identify bottlenecks.
- Update Failures: Sometimes updates may fail to install properly, resulting in incomplete functionality. Restarting the device and attempting the update again often resolves this issue. If problems persist, consult the software’s support page for specific error codes or troubleshooting steps.
- Loss of Data: Users might experience data loss, which can be mitigated through regular backups. Employ automated backup systems to ensure data integrity and have recovery options readily available.
- Unexpected Features: New updates can introduce changes in configurations or features that may disrupt usual operations. Familiarize yourself with update notes provided on the vendor’s site to understand new functionalities fully and adjust settings as necessary.
- Network Issues: A poor internet connection can hinder updates, leading to corrupted downloads. Verify network stability and consider using a wired connection for more reliable connectivity, especially for larger updates.
Post-Update Steps and Best Practices
After updating your nameservers, it’s crucial to perform several post-update steps to ensure your website runs smoothly and securely. Here are the best practices to follow:
- Monitor DNS Propagation: After changing nameservers, it can take up to 48 hours for these changes to propagate across the internet. Use tools like WhatsMyDNS to check if your domain resolves to the correct IP address globally.
- Check Site Performance: Use performance monitoring tools such as GTmetrix or Pingdom to evaluate your website’s load time and performance post-update. This is essential to identify any potential issues caused by the nameserver change.
- Validate Security Settings in Cloudflare:
- SSL/TLS Configuration: Ensure your SSL settings are properly configured. Under the Cloudflare dashboard, navigate to the SSL/TLS app and select the desired SSL mode (e.g., Full or Flexible) that aligns with your server’s settings.
- Firewall and Security Rules: Review your firewall rules to ensure they are actively protecting your site from threats. Consider enabling Web Application Firewall (WAF) if it’s not already activated. This is optional for fast addition of domain to cloudflare if you want is just for cloudflare to manage your domain.
- Test Key Functionalities: Check if essential features of your website, such as forms, e-commerce functionalities, and login areas, work correctly. A thorough testing process helps in identifying any malfunctions that might arise from the configuration change.
- Set Up Monitoring Alerts: Configure alerts within Cloudflare or a third-party service to notify you of any downtime or performance issues. This proactive approach will allow you to address problems as they arise.
- Update Analytics Tools: Ensure that your web analytics tools, such as Google Analytics, are tracking correctly. You may need to check and possibly update the tracking code, especially if you changed your site’s URL or domain settings.
- Review and Optimize Caching: Check Cloudflare’s caching settings to optimize how long resources are cached. Regularly purging the cache after significant updates can also help in reflecting recent changes instantly.
By following these steps and best practices, you can effectively manage your website’s performance and security after a nameserver update. For further insights on DNS management and web hosting best practices, check our blog on cheap web hosting or delve into our guide on Cloud VPS hosting.

